
To make ultra-creamy homemade ice cream, start with high-fat dairy like heavy cream and whole milk to boost richness. Incorporate stabilizers such as guar gum or cornstarch to keep it smooth and prevent ice crystals. Chill the mixture thoroughly before churning, and use proper freezing techniques in airtight containers. Adding a splash of alcohol can help keep it soft. Stay tuned for more tips to perfect your ice cream craft!
Key Takeaways
- Use high-fat dairy like heavy cream and whole milk to boost richness and achieve a silky texture.
- Chill the mixture thoroughly and add stabilizers to prevent ice crystals and ensure smoothness.
- Incorporate emulsification techniques to evenly distribute fats, enhancing creaminess and preventing separation.
- Add a small amount of alcohol to lower the freezing point, making the ice cream softer and scoopable.
- Store in airtight containers and maintain a consistent, cold freezer temperature to preserve ultra-creamy texture.

Amazon Grocery, Heavy Whipping Cream, Ultra-Pasteurized, 32 Fl Oz
One 32 fluid ounce carton of Heavy Whipping Cream, Ultra-Pasteurized
As an affiliate, we earn on qualifying purchases.
As an affiliate, we earn on qualifying purchases.
Use the Right Fat Content for Creaminess

To achieve that rich, smooth texture in your homemade ice cream, it’s vital to choose the right fat content. The cream to milk ratio greatly impacts creaminess, so aim for a balance that provides enough fat without making the mix too heavy. Generally, a higher fat percentage, around 10-14%, results in a silkier, more indulgent dessert. Using heavy cream with a fat content of 36% or more boosts richness, while adding whole milk helps maintain the proper consistency. If your goal is ultra-creamy ice cream, prioritize ingredients with a higher fat percentage and adjust the cream to milk ratio accordingly. This careful fat content balance can also help preserve the quality and benefits of your homemade treat over time. Incorporating the right type of dairy fats ensures your ice cream stays smooth and luscious from the first scoop to the last.

MB Herbals Guar Gum Powder 8 oz (0.5 LB / 227 Gram) | Gluten Free Thickening Agent for Soups Sauces Curries Ice-Creams
Guar Gum is used as Emulsifying, Stablizing and Thickening Agent for Soups, Sauces, Curries, Ice-cream & Pastries.
As an affiliate, we earn on qualifying purchases.
As an affiliate, we earn on qualifying purchases.
Incorporate Stabilizers for Smooth Texture

Adding stabilizers to your ice cream mixture can considerably enhance its smoothness and prevent ice crystal formation. Stabilizer types include commercial options like guar gum, carrageenan, and xanthan gum, which effectively improve texture. You can also use natural thickeners such as gelatin, cornstarch, or agar-agar. These ingredients help bind water molecules, reducing ice crystal growth and creating a creamier finish. To incorporate them, add small amounts during mixing—usually around ½ teaspoon per quart—and blend thoroughly. Natural thickeners are especially popular if you prefer cleaner ingredients or want a more organic approach. Their ability to stabilize emulsions ensures your homemade ice cream stays luxuriously smooth, even after storage. Using the right stabilizer types ensures your homemade ice cream stays luxuriously smooth, even after storage. Incorporating stabilizer effectiveness into your process can further ensure consistently creamy results. Additionally, understanding heat pump technology advancements can also contribute to more energy-efficient and environmentally friendly ice cream making by maintaining optimal freezer temperatures. Exploring different stabilizer options can help you customize the texture to your liking for the perfect creamy consistency.

Dash Deluxe Gelato & Ice Cream Maker – HomeMade Dessert Maker with One-Touch Churning – Space-Saving Design & Easy to Clean – 2 Quarts, Cream
Effortless Homemade Treats: The Dash Deluxe Gelato & Ice Cream Maker is easy to use with one-touch churning…
As an affiliate, we earn on qualifying purchases.
As an affiliate, we earn on qualifying purchases.
Chill Your Mixture Thoroughly Before Churning
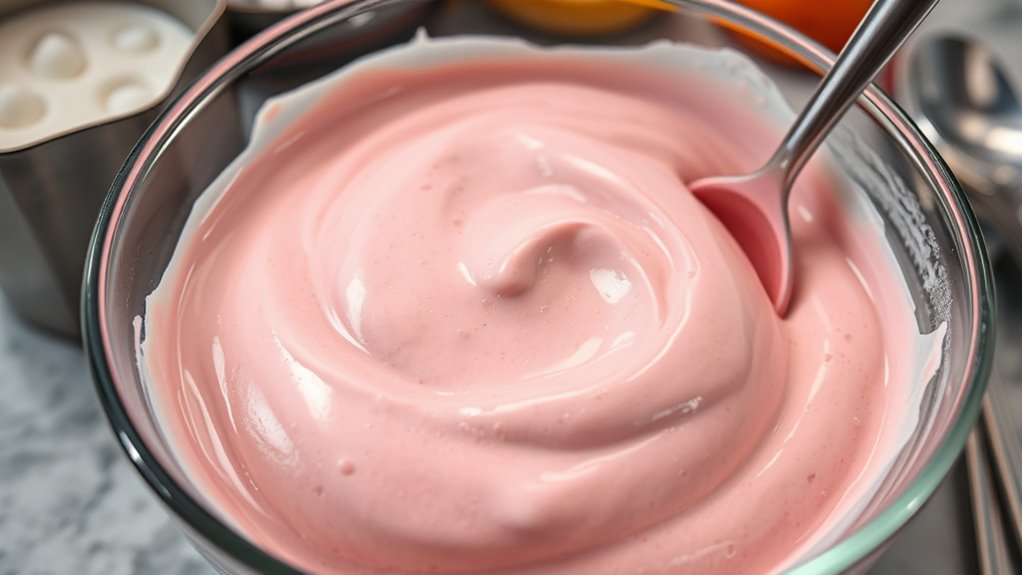
Chilling your ice cream mixture thoroughly before churning is essential for achieving a smooth, scoopable texture. Proper chilling guarantees your mixture is cold enough to promote rapid freezing, which creates smaller ice crystals. Use effective mixing methods, like stirring or whisking, to evenly distribute flavors and infusions before chilling. Incorporate flavor infusions at this stage to allow the flavors to meld as the mixture cools. The more thoroughly your mixture cools, the better it will churn, resulting in a creamier final product. Temperature control is crucial to prevent the formation of large ice crystals that can compromise texture. Avoid rushing this step; refrigerate for at least 4 hours or overnight. A well-chilled mixture prevents ice crystal formation, ensuring your homemade ice cream is irresistibly smooth and creamy with every scoop. Additionally, maintaining a consistent freezing temperature during storage helps preserve the ideal texture over time. Regularly maintaining a pet hair management routine can also help keep your kitchen surfaces fur-free, making cleanup easier after preparing your delicious treats. Proper kitchen hygiene practices further ensure that airborne contaminants are minimized, which can help preserve your ice cream’s freshness.
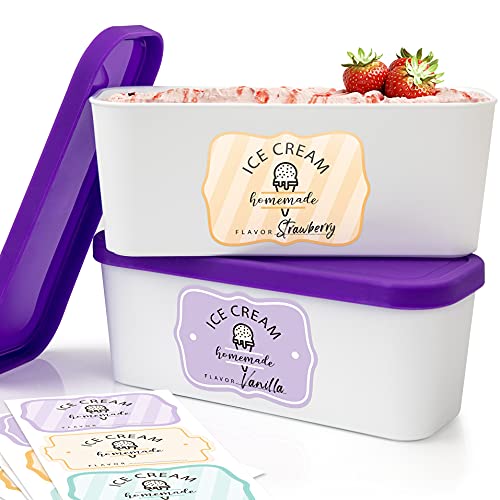
Set of 2 Reusable Ice Cream Tub Containers 1.6 Quart Ea. – Perfect for Homemade Sorbet, Frozen Yogurt Or Gelato – Stackable Storage Containers, Stickers And Lids Stores Easily In Freezer
Perfect For Homemade Ice Cream & More: The ice cream tub set of 2 is a great way…
As an affiliate, we earn on qualifying purchases.
As an affiliate, we earn on qualifying purchases.
Opt for Full-Fat Dairy Products

Using full-fat dairy products gives your ice cream a richer, creamier texture that’s hard to beat. Whole milk and cream add depth and smoothness, making each bite more indulgent. Remember, the butterfat content is what truly makes your homemade ice cream stand out.
Richness From Whole Milk
Ever wondered why some homemade ice creams taste richer and creamier? The secret lies in milk composition, especially dairy fat. Whole milk contains a higher percentage of fat, which directly boosts the creaminess of your ice cream. Dairy fat adds a smooth, luxurious mouthfeel that low-fat options can’t replicate. When you use full-fat milk, you’re providing your ice cream with natural richness that enhances flavor and texture. Skim or reduced-fat milk simply won’t deliver the same depth, as they lack the necessary fat content to create that luscious, velvety result. So, for that ultra-creamy texture, always opt for whole milk. Its natural dairy fat is essential for achieving the rich, indulgent quality that makes homemade ice cream stand out. Using fresh dairy products ensures you get the best quality fat content, leading to superior creaminess.
Cream Elevates Texture
Choosing full-fat dairy products can make a noticeable difference in your homemade ice cream’s texture. Whipped cream adds richness and creates a smooth, velvety mouthfeel, making each bite feel indulgent. Incorporating cream cheese can also enhance creaminess, giving your ice cream a dense, luxurious texture that’s hard to achieve with lighter options. These ingredients contain higher fat content, which helps prevent ice crystals from forming and keeps the ice cream soft and scoopable. When you use full-fat dairy, your mixture becomes creamier and more stable during freezing. Additionally, filter maintenance can help ensure your ingredients stay fresh and free from contaminants, further improving the quality of your homemade ice cream. So, opt for heavy cream, full-fat milk, or cream cheese whenever possible. This simple step transforms your homemade ice cream into a decadently creamy treat that’s irresistibly smooth.
Butterfat Matters Most
Since fat contributes directly to the creaminess and stability of your ice cream, opting for full-fat dairy products is essential. The key is to pay attention to butterfat composition, as higher dairy fat content results in a richer, smoother texture. The use of healthy fats from dairy enhances flavor and creates a velvety finish. Incorporating proper storage techniques can also help maintain the quality and consistency of the fats in your ice cream. Low-fat or skim milk won’t provide the same luxurious mouthfeel you’re aiming for. Full-fat cream and milk contain the right balance of dairy fat content to enhance flavor and create a velvety finish. When shopping, choose products labeled with higher butterfat percentages, such as heavy cream or whole milk. This ensures your ice cream develops that ultra-creamy consistency you want. Remember, the more dairy fat you include, the better your chances of achieving that irresistibly smooth, rich result. Additionally, selecting processing techniques that preserve fat integrity can further improve the final texture of your homemade ice cream. Properly handling and stabilizing fats during preparation can help maintain creaminess throughout storage. Incorporating emulsification methods can also help evenly distribute fats for a more consistent texture.
Master the Art of Proper Freezing Techniques

Make certain to chill your ice cream base completely before freezing to prevent ice crystals. Transfer the mixture into airtight containers to keep out moisture and maintain flavor. Properly freezing your ice cream ensures a smooth, creamy texture every time.
Chill Base Thoroughly
Have you ever wondered why your homemade ice cream doesn’t turn out as creamy as you’d like? The secret is in chilling your base thoroughly before freezing. A well-chilled mixture guarantees better mixing techniques, preventing ice crystals from forming and creating that smooth texture you crave. To do this, cover your bowl tightly and let it sit in the fridge for at least 4 hours or overnight. This step also helps infuse flavors deeply, enhancing your flavor infusions. When your base is cold, it freezes faster and more evenly, resulting in a creamier consistency. Remember, rushing this step can lead to a gritty texture. Taking the time to chill your base thoroughly is key to mastering that ultra-creamy finish you’re after. Proper freezing techniques ensure your ice cream achieves the ideal creamy texture you desire. Additionally, using a quality ice cream maker can further improve texture and smoothness.
Use Airtight Containers
Using airtight containers is essential for maintaining the quality of your homemade ice cream. They prevent ice crystals from forming and preserve the smooth, creamy texture you crave. Plus, airtight containers help with flavor infusion, ensuring your ice cream stays deliciously fresh and full of taste. For best results, choose containers that seal tightly and are freezer-safe. To keep your flavors vibrant, avoid opening the container too often, which lets in moisture and weakens the seal. Here’s a quick comparison:
| Benefits of Airtight Containers | Tips for Use |
|---|---|
| Prevents ice crystals | Seal tightly after each use |
| Maintains flavor infusion | Don’t overfill to allow expansion |
| Preserves freshness | Label with date for freshness |
Master these tips, and your ice cream will stay ultra-creamy and flavorful!
Add a Touch of Alcohol for Softer Scoops

Adding a splash of alcohol to your homemade ice cream can make a noticeable difference in its texture. Alcohol infusion reduces the freezing point, preventing the ice cream from becoming too hard, which results in softer, scoopable servings. Just a small amount—about one to two tablespoons per quart—can enhance flavor without overpowering it. Choose spirits like vodka or rum, which have neutral or complementary flavors, to boost flavor enhancement without altering the base taste. Keep in mind, too much alcohol can prevent the mixture from freezing properly. Stir it in during the final stages of churning, ensuring even distribution. This simple trick creates a smoother, more luxurious texture, making your ice cream easier to serve and more enjoyable to eat.
Frequently Asked Questions
Can Non-Dairy Milk Be Used for Ultra-Creamy Ice Cream?
You can absolutely use plant-based milks for ultra-creamy ice cream. Non-dairy options like coconut, cashew, or almond milk work well, especially when combined with flavor enhancements like coconut cream or added fats. These milks create a rich, smooth texture, but you might need to adjust sweeteners or thickeners to achieve the creamiest results. Experimenting with different plant-based milks lets you customize your ice cream to your taste and dietary preferences.
What Alternative Stabilizers Can I Use Besides Traditional Options?
Imagine your ice cream as a silky sailboat gliding smoothly across a calm sea. To keep it steady, you can try vegan stabilizers like agar-agar or guar gum, which act as natural thickeners, anchoring your creamy creation. These natural thickeners help prevent ice crystals and keep your ice cream irresistibly smooth. Experimenting with plant-based options not only boosts creaminess but also guarantees your treat remains entirely vegan-friendly.
How Does Sugar Type Influence Ice Cream Creaminess?
You’ll notice that the type of sugar you use directly affects ice cream creaminess by influencing sugar crystallization and sweetness modulation. Using superfine or invert sugars helps prevent large crystals, creating a smoother texture. Meanwhile, different sugars offer varying levels of sweetness, allowing you to tailor flavor without over-sweetening. By selecting the right sugar, you guarantee your ice cream stays ultra creamy and perfectly balanced in sweetness.
Is It Necessary to Churn Ice Cream Immediately After Mixing?
You don’t need to churn ice cream immediately after mixing, but it’s recommended for best results. Churning helps incorporate air and break up ice crystals, improving texture preservation. Proper freezing techniques, like using a cold, airtight container, prevent large ice crystals from forming. If you delay churning, the mixture may become icy and less creamy. For ultra creamy ice cream, churn promptly and freeze quickly for ideal texture and flavor.
How Long Should Homemade Ice Cream Be Stored for Optimal Texture?
They say “patience is a virtue,” and it’s true for homemade ice cream too. For ideal texture, you should store your ice cream for at least 4 hours, preferably overnight. This allows the flavors to meld and the texture to firm up. Avoid storing it for more than a week, as it risks freezer burn and loss of creaminess. Proper storage duration ensures your ice cream stays rich, smooth, and delicious.
Conclusion
Now that you know these secret hacks, making ultra creamy homemade ice cream is easier than ever. Don’t worry if it takes a few tries—think of it like perfecting your favorite recipe. Picture a scoop that’s velvety and smooth, melting perfectly on your tongue. With the right fats, thorough chilling, and a splash of alcohol, you’ll craft irresistible ice cream every time. Just follow these tips, and enjoy your delicious, homemade frozen treat!